Monday, February 22, 2010

My software development goals

I just recently finished my UF application — Woo-hoo! I'm glad to have it done, but I actually enjoyed writing one of the "statement of intent" essays. Here's the thought-provoking prompt.

What are the core skills and knowledge you hope to acquire by completing a degree in this major and how do you plan to apply these when you graduate?

I enjoyed elucidating what I hope to learn in my Computer Science program and how I plan to apply that knowledge. In the end, I came up with the following goals for my education and my career.

What I want to learn about programming

Good software design
In order to write readable, efficient code, I need to see examples of good code and learn what makes it good. I plan to study algorithms, design patterns, and best practices to learn how best to solve common programming problems.
Alternative programming methods and languages
If I only learn about common solutions to problems, I could never discover new solutions. That's why I'm going to learn about some of the more obscure and academic regions of software development, including functional programming, declarative programming, and other programming paradigms I don't even know about yet.
Low-level programming
I know that if I want to create truly groundbreaking software, I won't be able to rely on high-level languages and pretty abstractions. I'm going to learn about Assembly language and C in order to increase the efficiency of my own applications and to create entirely new OSs and languages.
Writing concurrent code
One of the safest bets in predicting the future of technology is that future computers will have an increasingly large number of processors. Applications that can't take advantage of multiple cores will soon be surpassed by programs that use concurrency effectively. I want to be on the winning side, so I'm going to learn to write concurrent applications with STM, Erlang, and *shudder* even threads. I believe knowledge of concurrent programming will be critical to many of my future projects.

How I will use my programming skills

Creating useful software
I have resolved to never work on an application that doesn't do something useful. Innovative code is nothing if it's part of a worthless piece of shovelware or a soulless enterprise application.
Making my software intuitive
I'll also try to make all my programs intuitive and easy-to-use. When I can, I'll put the needs and wants of the user first, before application structure, technological achievement, and even code readability, although I hope I never need to make that choice. I want my software to make a difference; it's rare that an application or library with an arbitrary, complex interface changes the world.
Improve the process of programming
I plan to work on projects that will not only serve typical computer users but also help other software developers. My goal is to make it easier for coders to write readable, efficient, correct code and create helpful, intuitive interfaces for their applications. I want to leave programming in a better state than I found it.
Explore new technologies
Memristors. Quantum computing. Optical processors. Biological computers. All these rapidly-approaching breakthrough computing technologies will require new programming methods to match. I will always be looking for opportunities to push the field of programming in new and exciting directions.

I know that I may not be able to learn all that I plan to learn, and I might not accomplish all that I hope to accomplish. However, writing out my programming goals has helped me to realize precisely what aspects of programming I find most interesting and important. I think every college student should list his education and/or career goals, if only to provide a derisive laugh or a grin of satisfaction when he reaches the end of his career.

Monday, February 8, 2010

Broward College engineering club

This semester, I have decided to participate in Broward College's engineering club. Each semester, Professor Rolando Branly gathers a group of students from the Physics classes and labs he teaches to work on an engineering project. Last semester, he and his group built a mockup capsule for low-gravity research in cooperation with Masten Space Systems. This semester, we have a more concrete project.

Professor Branly is working on securing a slot on the last shuttle mission for our experiment. We will be attempting to crystallize proteins in space!

The plan

Of course, the process begins long before the shuttle launches and ends long after. Here's a brief summary of the process.

Choose target proteins
Professor Branly has already narrowed our options down to a few proteins related to metabolism and diabetes research, but we still have a couple options. PPAR gamma is our leading choice.
Manufacture proteins
Once we've found a protein of interest, we need to acquire enough with which to work. Hopefully, we will be able to outsource this step to the chemistry/biology department, but if not, we'll need to genetically engineer a colony of E. coli bacteria to churn out our protein. Then, we must isolate the protein from the bacterial solution.
Crystallize proteins
This promises to be the most difficult and complicated step. We plan to send the proteins to the International Space Station on the last Shuttle flight, let them crystallize in anti-gravity for about two weeks, and retrieve them on the return flight of the Shuttle. Unfortunately, protein crystallization is a developing art known to few and mastered by none — Professor Branly calls it a "black art." We'll test many different solutions and methods here on Earth to try to find the perfect setup.
Shoot x-rays at our protein crystals
If we can successfully crystallize some proteins, we will analyze the crystals through a process called x-ray crystallography. In brief, we will shoot a laser of x-rays at a rotating protein crystal and record the diffraction pattern of the x-rays. I'm not sure whether we will be imaging the crystals ourselves or sending them off to a specialized facility for examination.
Analyze diffraction patterns
Finally, we're going to analyze the x-ray patterns with crystallography software. We'll use either Phenix or CCP4 to convert the patterns of x-ray dots into 3D models of the crystallized proteins. These models will allow drug companies to create molecules that can enhance or inhibit the functioning of the proteins in human cells.

Engineering club information

If you want to join the club or help us with our project, you can join our Facebook group, email our coordinator, Professor Branly, or visit our new website, BrowardEngineering.info. We'll need all the help we can get!

Monday, January 25, 2010

Breaking windows

There's been a lot of uncertainty going around the standard desktop computer model recently. More people are using smartphones, netbooks with custom interfaces, and other non-traditional interfaces than ever before. People are questioning many aspects of the desktop computing model: the typical separation between the client and server data (Google Chrome OS), the exclusive right of the browser to access internet content (Moblin), and even the traditional software distribution and installation system (iPhone App Store, Linux repositories).

All of these trends are interesting, but my favorite upcoming innovation is the disposal of the desktop metaphor UI idiom.

Desktop metaphor summary

The desktop metaphor is a method of computer interaction based on an office desk. Applications are run in windows, each one representing a document or tool lying on a desk.

Screenshot of the Gnome desktop

A screenshot of a typical UI based on the desktop metaphor.

The windows can be moved around, minimized, and closed through keyboard shortcuts and mouse interaction.

Problems

Unfortunately, the desktop metaphor has the same shortcomings as a real desk. Just as in meatspace, I constantly have to move things around to see what I want to see, and when I run out of space, I have to move things off the desktop. Some applications take up less space by allowing me to run multiple instances in separate tabs in the same window; most web browsers and my text editor (Notepad++) have this feature. Although these tabs simplify the interface of the application, they add complexity to the desktop as a whole. Every tab-based application works slightly differently, with different keyboard shortcuts for tab management and different tab behavior. It's a mess.

Possible solutions

Right now, there are several approaches to improving application management that ditch the desktop metaphor entirely.

  • 10/GUI

    10/GUI proposes a new form of interaction to replace the mouse along with a new application management system suited to the new control method. It's concept is a multitouch slate capable of registering 10 simultaneous inputs (fingers) along with pressure for each input. The new app manager places all the "windows" in a continuous horizontal band that extends beyond the left and right edges of the screen. Various combinations of finger presses allow the user to scroll within a single application or scroll the entire band to expose other applications. You really need to watch the slick concept video to understand.

    Unfortunately, the video is only a concept, and the creator doesn't appear to have any plans to actually implement the system. In addition, the system would require an entirely new interface device to work as planned. However, I believe the new app manager could be beneficial without the new input mechanism. It's still significantly simpler than the current window-based disaster.

  • Chromium OS

    This revolutionary open-source OS ditches the idea of multiple applications entirely, confining all actions to a single tabbed browser (Google Chrome). Client-side applications are mostly replaced by web applications and windows are replaced by browser tabs. This OS's radical UI was designed for small-screened netbooks, so it's obviously not suitable for all computers. However, I appreciate this spartan interface's extreme efficiency.

In my opinion, a rethinking of the desktop metaphor would be the most beneficial change to the desktop computer experience. I eagerly anticipate the alternatives to this outdated model.

Wednesday, January 13, 2010

Compiling C++ from command line

I'm finally taking an introduction to C++ class at college, and I needed to install a compiler. I had intended to use the GCC, but I chose the Microsoft Visual C++ compiler instead because I wanted to become familiar with multiple compilers and because it was dead-simple to install.

Unfortunately, it was not dead-simple to use. After building and running only a simple "Hello, world!" test script, I longed for a simpler way to compile and run my scripts. I found a command-line compiling tutorial in the documentation and tried it out. The procedure worked fine, but it required starting a new terminal through a shortcut in the "Start" menu. I'm allergic to the "Start" menu, so I figured out how to setup the necessary environment variables from the command line. Now, I just run setupcppenv to prepare the environment, and I can compile 'till the cows come home (pardon the idiom).

Requirements

This tutorial is written for people who prefer to use the Windows terminal, so a familiarity with the command prompt is assumed. Also, you'll need to download and install the Microsoft Visual C++ Express Edition compiler; don't worry, it's free.

How to set up Windows to compile C++ from the command line

  1. Create a configuration script

    In order to simplify the configuration process and give us an easy command to remember, we're going to use a batch script to configure the environment for us. VCE comes with a setup script, but it's hidden in the directory in which VCE was installed.

    Find the shortcut "Visual Studio 2008 Command Prompt" in the "Start" menu under "Microsoft Visual C++ 2008 Express Edition > Visual Studio Tools" and view its properties. Create a new file in Notepad or the text editor of your choice, and copy the contents of the "Target" field into the new text file. Save the file as setupcppenv.bat on the desktop and click on it. If you see a command prompt pop up with "Visual Studio 2008 Command Prompt" in the title bar, your new batch script is working.

  2. Modify the batch script

    Unfortunately, the script works a little differently than I would like. To see what I mean, bring up a command prompt and cd to the desktop (or wherever you put the setup script.) Run the script with setupcppenv, then type in exit to close the command prompt. It didn't work, did it. That's because the batch script starts a new cmd process with the variables configured instead of just configuring them in the current process. In order to remedy this behavior, we'll have to modify our batch script.

    Right now, my script looks like this:

    %comspec% /k ""C:\Program Files (x86)\Microsoft Visual Studio 9.0\VC\vcvarsall.bat"" x86

    Yours will probably look different if you're using a 32 bit Windows version. To prevent the command from starting a new process, we need to take out %comspec% /k and convert the double double quotes into single double quotes. After that change, my script looked like this:

    "C:\Program Files (x86)\Microsoft Visual Studio 9.0\VC\vcvarsall.bat" x86

    Now, our command prompt will terminate on the first exit.

  3. Set up script bin

    Right now, our setup script works fine, but it only works on the desktop. Obviously, storing all our source files on the desktop is a bad idea, so we need to make our script accessible to the whole computer. We can do that by adding it to the Windows Path.

    Path is an environment variable on Windows systems that lists places for the OS to look for scripts. When you run a command from the command line, Windows looks in all the directories listed in the Path for a script matching the command you entered. If it finds one, it runs it.

    We could, of course, add the script's current location to the Path and use our script anywhere; however, we would have to keep the original script on the desktop forever in order for it to remain accessible. Instead, we will create a dedicated directory for storing command line scripts. We will call it bin and place it in the home directory. You can find your home directory by running echo %homepath% from the command prompt. Create a directory called bin in there, and move setupcppenv.bat into the new directory.

    Now we will add bin to the Path. Open the Control Panel, and find the "System" options (you might have to switch to Classic View in Vista). Open the "Advanced system settings" dialog box and click on "Environment Variables". Edit Path under "User variables". Path is a list of directories separated by semicolons; add your new bin directory to it by appending a semicolon and the new directory's full path (C:\User\Sage\bin for me) to the Path. Don't add any spaces between the semicolon and the paths. If the field is empty, put in just your bin path. For example, the Path C:\Program Files\Acme Corp;C:\Program Files\Omnisoftware would become C:\Program Files\Acme Corp;C:\Program Files\Omnisoftware;C:\User\Your user name\bin. Save your change by hitting "OK" in all the dialog boxes.

  4. Test everything

    Now, we need to make sure everything has come together properly. Start by creating a new file in your text editor and plugging in this code:

    
    #include <iostream>
    
    int main() {
    
        std::cout << "Everything is working properly!\n";
        return 0;
    }
    

    Save the file as test.cpp on the desktop, then open a command prompt. Set up the environment with setupcppenv, cd into the desktop, and compile your C++ test script with cl /EHsc test.cpp. Run test.exe and revel in the simplicity of your new build procedure.

Now that I'm learning C++, you may start seeing some C++ on this blog. Don't be alarmed; I'm not turning into a pointer-crazed, multiple-inheriting C++ coder, thanks to my strong Python foundation. I plan to stick to the somewhat-comprehensible features of C++.

Saturday, January 9, 2010

Snowflake SVG developer release

Recently, I have been learning SVG scripting by porting my old branching-web AS3 script to Javascript. This time around, I wanted to remedy some of the shortcomings of the previous incarnation. Here's a list of some of my goals and how they turned out.

Goals

  • Allow the user to customize each node individually, but don't add too much complexity.

    Success. The interface has become slightly more complex, but it's still relatively simple.

  • Let a node have only one child, allowing the user to taper the branches.

    Success. This effect is highly useful for creating snowflake patterns.

  • Improve the demo interface, enabling interactive editing of each node.

    Pending. I plan to tackle this feature next.

Demos

Classic snowflake

Screenshot of a classic snowflake drawn by my library
Click to view as SVG.


function startup(evt) {
    var svgDocument = evt.target.ownerDocument;
    
    var rect = svgDocument.createElementNS(svgNamespace, 'rect');
    rect.setAttributeNS(null, 'fill', 'skyblue');
    rect.setAttributeNS(null, 'width', '100%');
    rect.setAttributeNS(null, 'height', '100%');
    svgDocument.documentElement.appendChild(rect);
    
    var endPoint = createDataNode(0, 0, 0, []);
    var endCap = createDataNode(0, 5, 10, [endPoint]);
    var middleNode = createDataNode(60, 50, 10, [endCap, endCap, endCap]);
    var centerNode = createDataNode(360, 30, 10, [middleNode, middleNode, middleNode, middleNode, middleNode, middleNode]);
    
    var web = createWeb(centerNode, createPoint(0, 0), 0);
    
    var snowflake = createSnowflake(web);
    
    var snowflakeSVG = snowflake.toSVG(svgDocument);
    snowflakeSVG.setAttributeNS(null, 'fill', '#fff');
    snowflakeSVG.setAttributeNS(null, 'transform', 'translate(250 250)');
    svgDocument.documentElement.appendChild(snowflakeSVG);
}

Gothic cross snowflake

Screenshot of a gothic snowflake drawn by my library
Click to view as SVG.


function startup(evt) {

    var svgDocument = evt.target.ownerDocument;
    
    outerPoint = createDataNode(0, 0, 0, []);
    
    taperFork = createDataNode(0, 5, 10, [outerPoint]);
    
    bigFork = createDataNode(180, 25, 10, [taperFork, taperFork, taperFork]);
    
    nextFork = createDataNode(180, 25, 10, [taperFork, bigFork, taperFork]);
    
    innerFork = createDataNode(360, 15, 10, [nextFork, nextFork, nextFork, nextFork]);
    
    var web = createWeb(innerFork, createPoint(0, 0), 0);
    
    var snowflake = createSnowflake(web, innerFork);
    
    var snowflakeSVG = snowflake.toSVG(svgDocument);
    snowflakeSVG.setAttributeNS(null, 'transform', 'translate(250 250)');
    svgDocument.documentElement.appendChild(snowflakeSVG);
}

Nodes displayed as points

Screenshot of a web of nodes drawn by my library
Click to view as SVG


function startup(evt) {

    var svgDocument = evt.target.ownerDocument;
    
    var endPoint = createDataNode(0, 0, 0, []);
    var middleNode = createDataNode(180, 50, 0, [endPoint, endPoint, endPoint, endPoint]);
    var originNode = createDataNode(360, 50, 0, [middleNode, middleNode, middleNode, middleNode]);
    
    var web = createWeb(originNode, createPoint(0, 0), 0);
    var webSVG = web.toSVG(svgDocument);
    webSVG.setAttributeNS(null, 'transform', 'translate(250 250)');
    svgDocument.documentElement.appendChild(webSVG);
}

Download

I've packaged up all the necessary scripts and SVGs into one tiny .zip archive for your hacking pleasure. If you'd like to see what I'm working on next (and possibly help), you can view my Google Code project repository. Everything is licensed under the Apache 2.0 license, so you can use it in a proprietary application, modify it in any way you choose, or pass it to all your friends provided you indicate where it initially came from. If you do anything interesting with it, tell me about it. Happy hacking!

Tuesday, December 29, 2009

NeoCubes: Best. Toy. Ever.

When I find something I like, I tell people about it. When I get payed for every person I convince to buy that something, I tell more people about it. For those two reasons, I want to tell you about NeoCubes, my new favorite time-wasting toy.

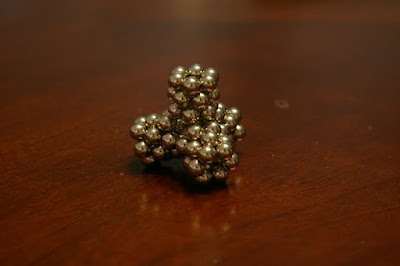
Each batch of NeoCubes includes 224 neodynium BBs and a faux velvet pouch. It's shockingly easy to lose track of time when you're playing with these addictive spheres. You can form them into anything: bands and rings, geometric shapes, flat patterns, or complex models. I've built a new model each time I've pulled them out of my pocket, and I'm not even close to the end of my creativity.

Here are a few of the models I built:

Eight-pointed star

Eight-pointed star

Four-pointed star

Four-pointed star

Truncated octahedron

Truncated octahedron

Truncated tetrahedron

Truncated tetrahedron

Large bomb

Large NeoCube bomb

Metal chu (my favorite)

Metal chu

I'm not the only one who enjoys them, either. After Christmas, I let a couple of my family members play with my set of 'cubes. Big mistake. After only a couple of minutes, even a close cousin would begin hunching over his 'cubes, casting suspicious glances at me, and mumbling to himself. Everybody came up with their own use for the NeoCubes: a cousin about my age used them to fashion herself bracelets and earings, but two younger cousins experimented with the interaction of rings of magnets on a smooth table. Even my seventy-nine-year-old grandfather enjoyed manipulating them with his fingers.

I carry my NeoCubes with me everywhere, pulling them out when my fingers become restless or when some metallic objects must be stuck together. Being a geek, both of these scenarios happen quite often.

You can buy a set of 224 NeoCubes for only $20 at Amazon. Compare that to about $70 if you purchase spherical magnets in bulk (I did). Buy some for you, your geeky friends, and everybody else you know and make me a rich man! If you're still not convinced, check out the demonstration video for the competing Buckyballs, but don't be fooled by the slick packaging and marketing. NeoCubes came out two years earlier, and they're $10 cheaper.

Saturday, December 5, 2009

Playing with SVG and Javascript

As a fan of ActionScript 3, Flash's vector-drawing scripting language, I've always been interested in the SVG standard. However, now that it's actually available to most of the web-browsing population, I have an excuse to learn more about it. I had stopped programming in AS3 because of the closed nature of the platform, its instability on Linux, and my inability to develop AS3 on Linux. However, I can now play with vector-drawing once again, thanks to the widespread adoption of SVG.

Anyway, this post is just a heads-up: I'm fiddling with SVG-scripting with Javascript, and I plan to write a tutorial about it soon. Thus far, I haven't found a basic tutorial on integrating HTML, SVG, and Javasript, and I hope my tutorial will remedy this perceived shortage. Of course, the tutorial is really just an excuse to play with Javascript and SVG, but I will continue to delude myself with words of altruism and selflessness. Helping people, that's what I'm doing...